Guest user checkout
This page describes how to redirect to a payment page hosted by Airwallex to accept payments.
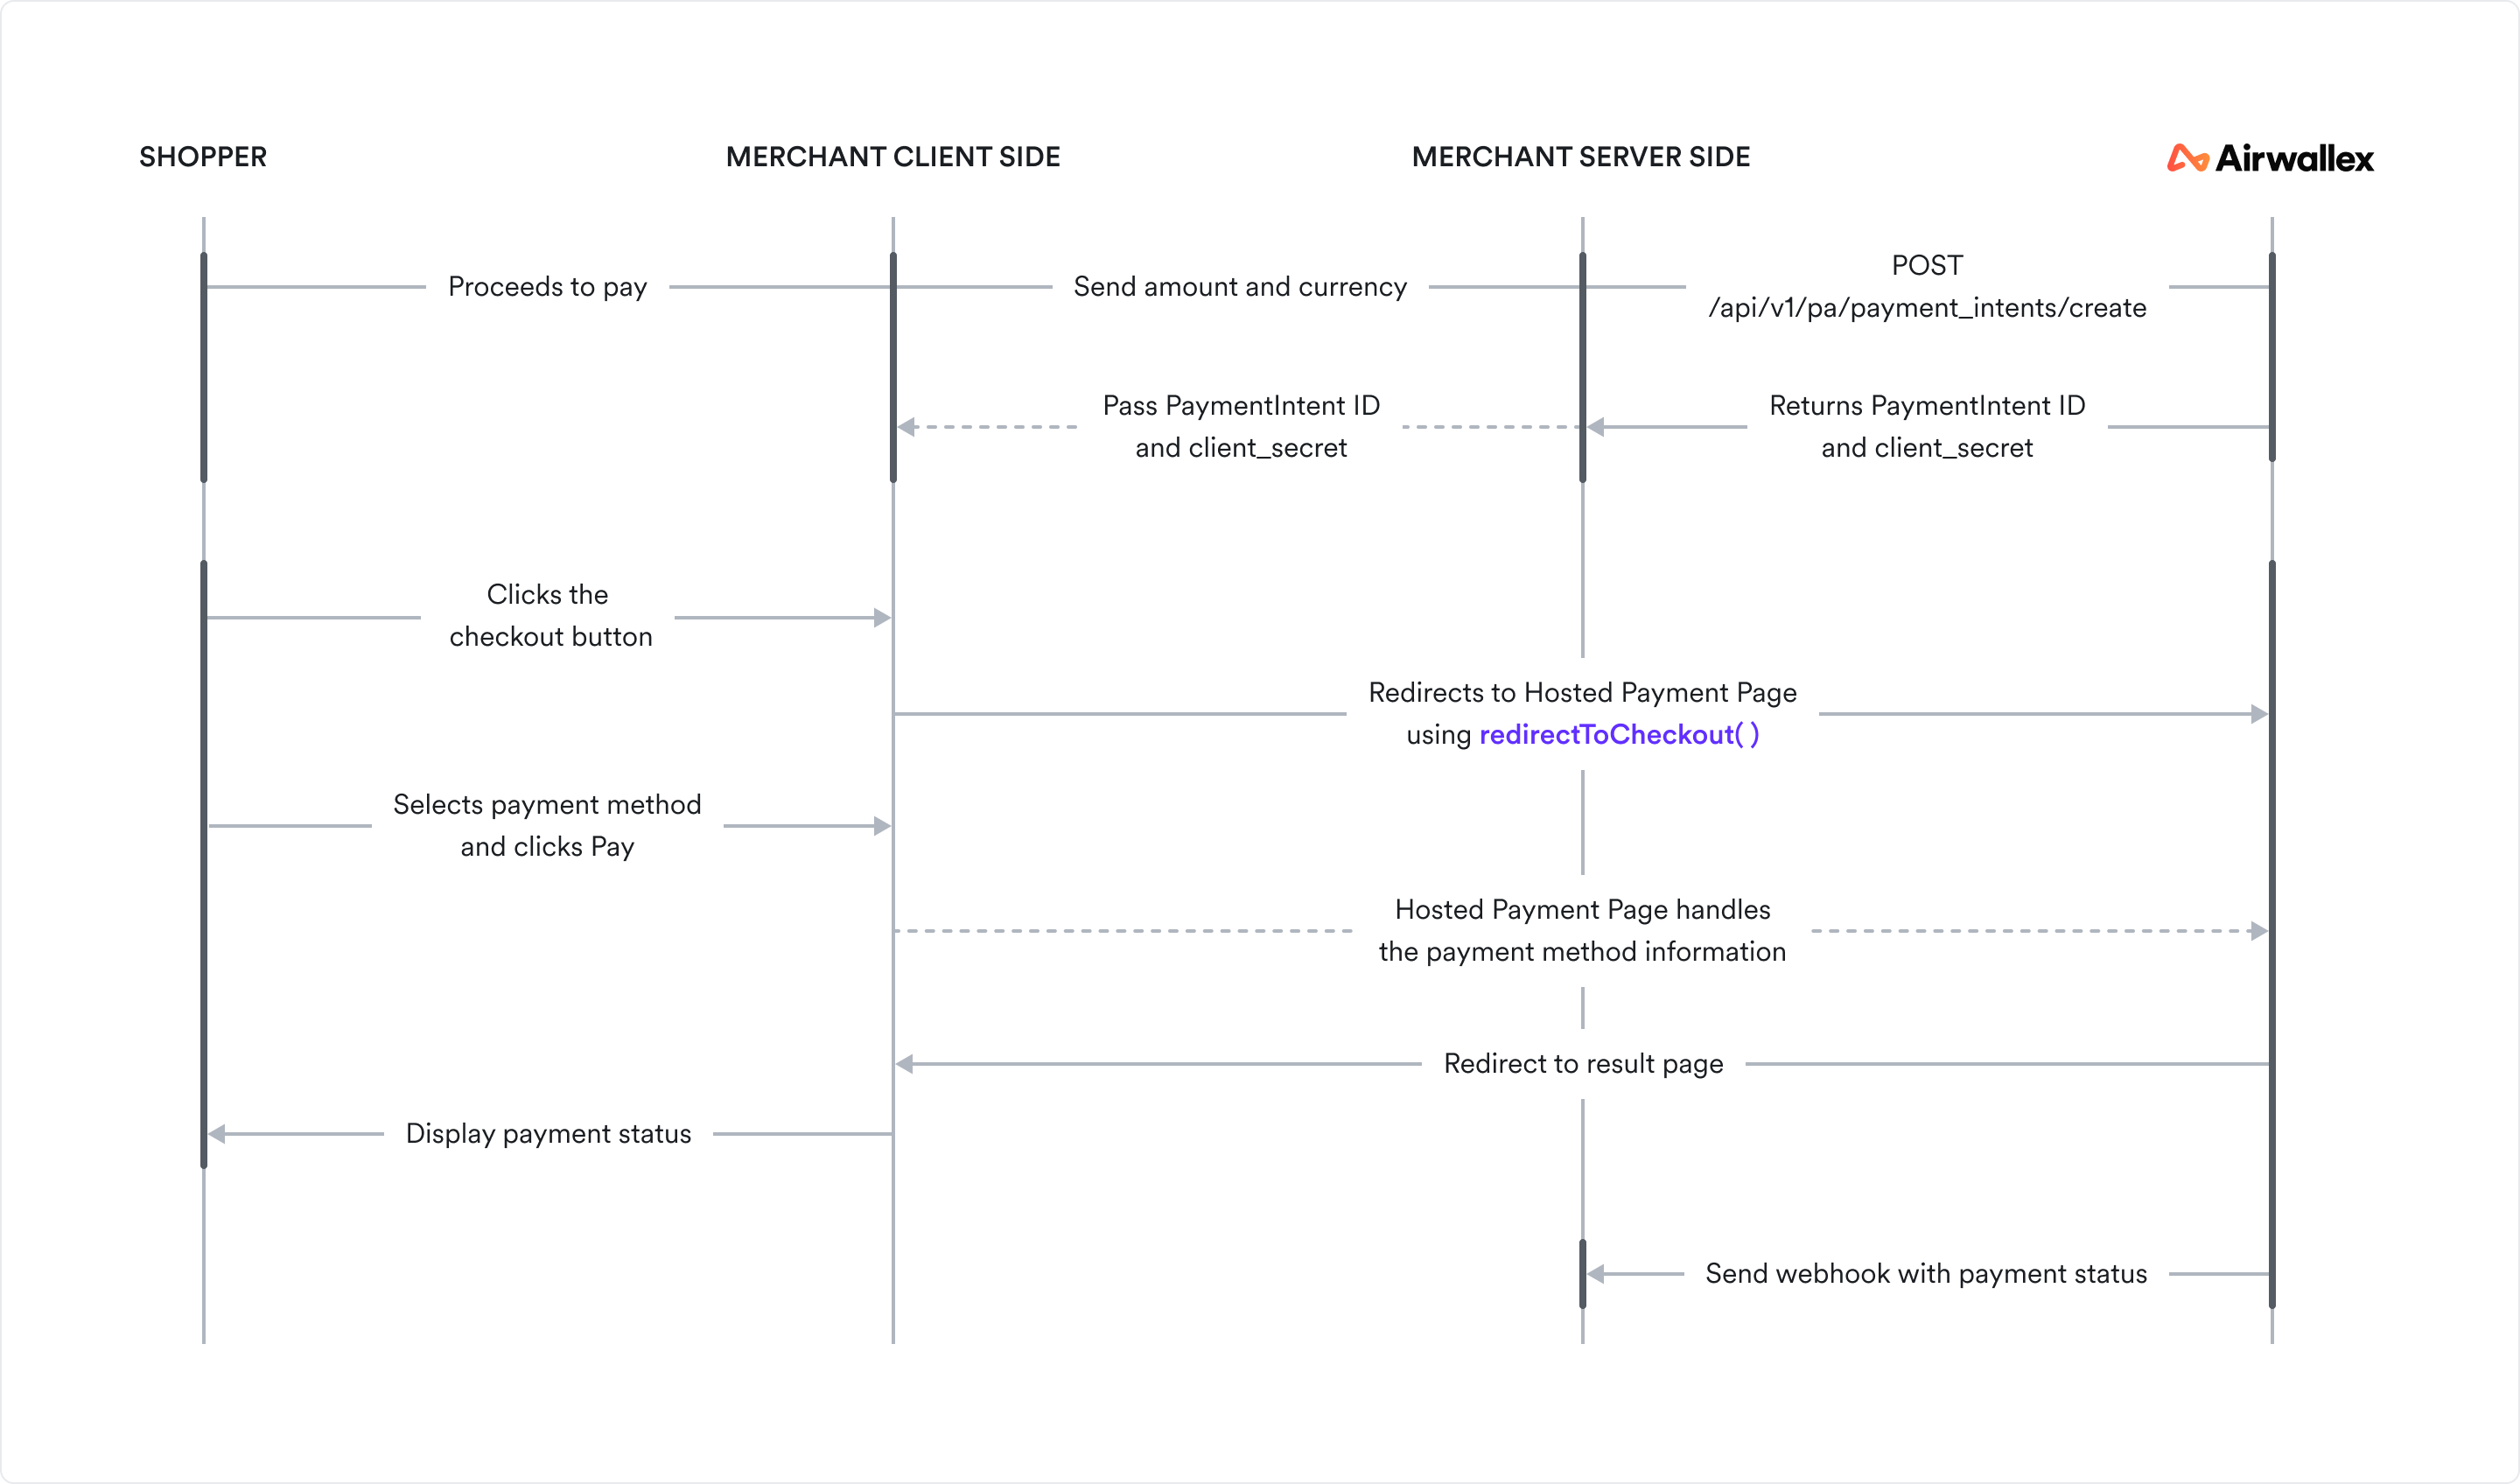
How it works
The diagram below depicts the information flow in a Hosted Payment Page integration.
Before you begin
Before you implement the integration, consider the following:
-
Ensure your Airwallex account has been activated for online payments.
-
Obtain your access token API by authenticating to Airwallex using your unique Client ID and API key. You will need the access token to make API calls.
-
Review the Hosted Payment Page JS to familiarize yourself with the Hosted Payment Page methods, parameters, and properties.
-
Install Airwallex.js JS. If your integration currently uses Airwallex Payment Elements , refer to our upgrade guide for information on migrating to Airwallex.js.
-
Download the working sample code to reference as you work through the below integration guide.
Step 1: Set up the server to create a PaymentIntent
When the shopper begins the checkout process, you will need to create a PaymentIntent object API to indicate your intent to collect payment from the shopper.
When the checkout page loads, on your server, call Create a PaymentIntent API with an amount and currency. Always decide how much to charge on the server side, a trusted environment, as opposed to the client. This prevents malicious shoppers from being able to alter the payment amount.
Provide return_url in Create a PaymentIntent API only if you plan to accept PayPal as a payment method. For any other payment method, the successUrl JS passed to the redirectToCheckout method on the client-side (see Step 3 below) will take precedence over the return_url provided here.
1curl -X POST https://api-demo.airwallex.com/api/v1/pa/payment_intents/create \2 -H 'Content-Type: application/json' \3 -H 'Authorization: Bearer {{ACCESS_TOKEN}}' \4 -d '{5 "request_id": "00e8df19-7087-4209-b50b-067d6a39ee72",6 "amount": 100,7 "currency": "CNY",8 "merchant_order_id": "Merchant_Order_a7f9baf8-884a-4def-ba85-d1f9be83470a"9 }'
The id and client_secret of the created PaymentIntent object API are returned in the response.
Step 2: Initialize Airwallex on your checkout page
First, you will need to install Airwallex.js JS. Once installed, initialize JS the package with the payments element enabled JS.
1import { init } from '@airwallex/components-sdk';23const { payments } = await init({4 env: 'demo',5 enabledElements: ['payments'],6});
Step 3: Add the redirect button to your checkout page
To redirect your shopper to the Hosted Payment Page, you will need a checkout button and a button handler to trigger the redirect.
Add the checkout button
1<button id="hpp">Checkout</button>
Add the button handler
When the button is clicked, call the redirectToCheckout JS method by providing the intent_id, client_secret, and country_code retrieved from Step 1 along with the payment currency (currency) and a return URL (successUrl).
1payments.redirectToCheckout({2 intent_id: 'replace-with-your-intent-id',3 client_secret: 'replace-with-your-client-secret',4 currency: 'replace-with-your-currency',5 country_code: 'replace-with-your-country-code',6 successUrl: 'https://your-website-host/your-success-path'7});
Airwallex will redirect your shopper to the Hosted Payment Page, display the payment methods you make available, collect the shopper’s payment method details, and trigger its authentication. Hosted Payment Page automatically handles 3D Secure authentication for the Card payment method, offering either the frictionless or challenge flows depending on the card issuer’s requirements.
You can also customize the Hosted Payment Page by using the options JS supported by the redirectToCheckout() method.
Step 4: Retrieve the payment result
If the payment is successful, your shopper will be redirected to the return URL you specified with the successUrl JS option. The ID of the PaymentIntent object API will be sent in the id URL query parameter and can be read and used from your return URL handler.
1https://your-website-host/your-success-path?id=int_xxxxx
If the payment fails, the shopper will be allowed to update the payment method and retry from the Hosted Payment Page itself.
For any actions subsequent to the payment such as shipping goods or sending email receipts, you can retrieve the payment result using the following options:
-
Webhooks: Set up webhooks to receive notifications related to payment lifecycle events. For example, Airwallex sends the
payment_intent.succeededevent when a payment succeeds. To build a reliable integration, listen for these events rather than waiting for the client-side redirect. On the client, the shopper could close the browser window or quit the app before your return URL handler is executed. For information on how to set up webhooks and listen for events, see Getting started with webhooks. -
API: On your server, call Retrieve a PaymentIntent API to inspect the status of the PaymentIntent object API.
-
Web app: Check the Payment Activity screen on your Airwallex web app.
Test your integration
Use test card numbers and the test and go-live checklist to test your integration for various success and error scenarios in the sandbox environment and then go live in the production environment.
Example integrations
Explore full, working code samples of integrations built using web frameworks like React.
Troubleshooting
For troubleshooting tips, see Airwallex.js error codes.