Embedded Transfer component
Note: To ensure full compatibility with the latest Transfer features and functionality, please verify that you are integrated with Client API version 2023-04-15 or later.
The Embedded Transfer component is a pre-built UI element for you to integrate into your own transfer flow for international bank transfers. It renders the user interface to help you collect required transfer information, such as country/region, beneficiary (recipient) type, transfer method, amount, date etc., while displaying other important information, such as currency conversion rates and fees.
Instead of building a native transfer flow from scratch, you can now use it along with the Embedded Beneficiary component to deliver a transfer experience that fully leverages Airwallex’s coverage while reducing development efforts and improving speed to market.
Please note that the Embedded Transfer component uses the same API version that you integrate with. As you upgrade API versions, the information rendered in the component will follow suit. This allows you to benefit from the continuous coverage expansion and product enhancements that Airwallex makes over time.
Key features include:
- Dynamic transfer coverage, i.e., available currencies, countries/regions and transfer methods one can pay out to based on the token authentication
- Customized theming to reflect your company's brand
- A 1-minute stable currency conversion rate that can be shown to the user so they know exactly at what rate their funds will be converted
- Ability to pre-fill information that have already been collected (e.g. amount), and disable or hide fields where applicable
To view and interact with the Embedded Transfer component, go to the Embedded Components demo site .
This page describes how to embed the transfer component on your page to start creating a transfer flow. See how to embed the beneficiary component in addition to the transfer component in Embedded Beneficiary component.
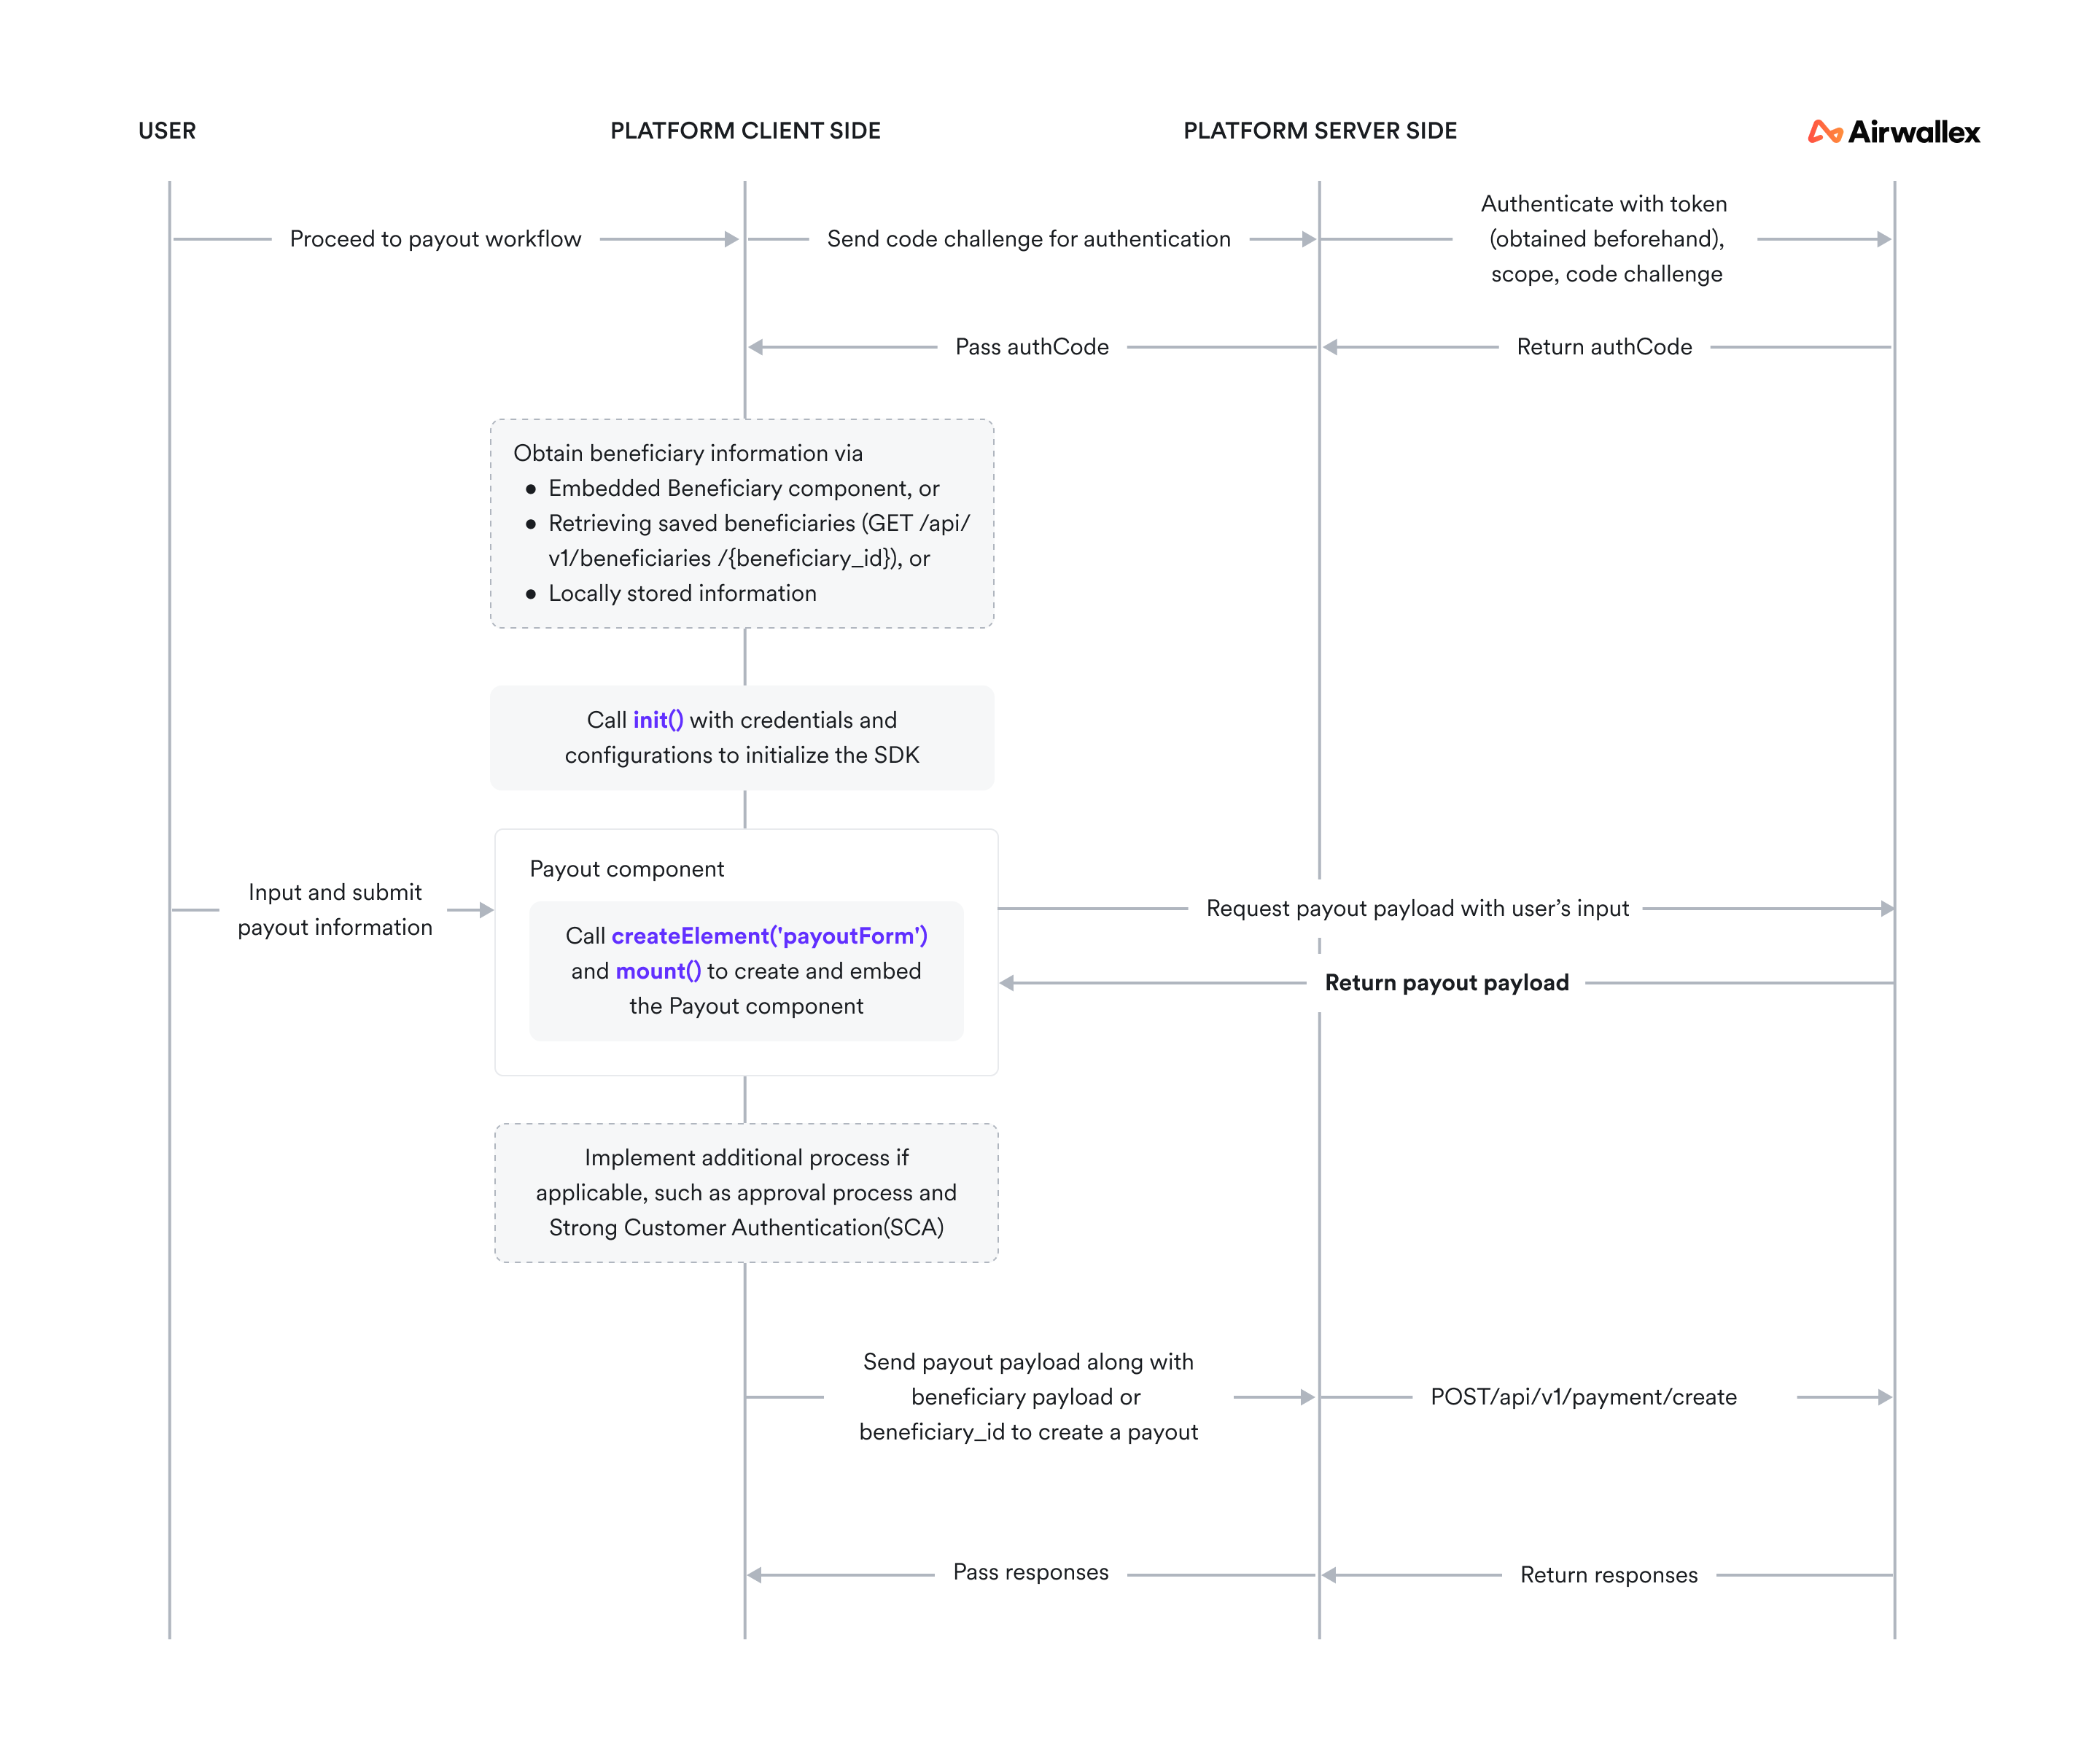
How it works
The diagram below depicts the interactions between the actor and the client-side system as well as the message exchanges between server-side systems during a transfer creation flow that involves the use of the Embedded Transfer component. This is a good place to start for understanding the high-level technical sequencing when using the component in your integration.
Before you begin
-
Obtain your access token API by authenticating to Airwallex using your unique Client ID and API key. You will need the access token to make API calls.
- If you are building a product experience for your customers to make transfers using connected accounts as a platform, connected account IDs are needed when authenticating to Airwallex for the access token.
-
Explore the Transfer Element reference JS to familiarize yourself with the Transfer Element methods, parameters, and properties.
-
Install and initialize Airwallex.js JS. If your integration currently uses Airwallex Payouts Web SDK , refer to our upgrade guide for information on migrating to Airwallex.js.
-
Build and test your integration in the sandbox environment first before going to production. Make sure to account for various success and error scenarios. Contact your Account Manager to get Airwallex demo accounts set up.
Step 1: Initialize the SDK
Import the SDK
12yarn add '@airwallex/components-sdk'34//Or with npm5npm install '@airwallex/components-sdk'6
Set up the server for authentication
Before beginning the process, you will need to get an authorization code to authorize the user into the Embedded Transfer component workflow. Always get authorization codes on the server side, a trusted environment. This prevents malicious users from being able to alter the scope.
When your page loads, on your server, call Authorize an account API with the following required fields in the request:
scope: Indicates the resources your application is allowed to access. For this SDK, you must providew:awx_action:transfers_editas the scope.code_challenge: Generate a challenge token together with thecode_verifierusing the S256 generation method as described in RFC 7636 Section 4 .code_challenge = BASE64URL-ENCODE(SHA256(ASCII(code_verifier))). Use a third-party package to generatecode_verifierandcode_challengeor use the following code example in JavaScript.
1// Generate code_verifier2const dec2hex = (dec: number) => {3 return ('0' + dec.toString(16)).slice(-2);4};56const generateCodeVerifier = () => {7 // generate random length for code_verifier which should be between 43 and 1288 const length = Math.random() * (129-43) + 43;9 const array = new Uint32Array(length/2);10 window.crypto.getRandomValues(array);1112 return Array.from(array, dec2hex).join('');13};1415const codeVerifier = generateCodeVerifier();
Install js-base64 package.
1import { Base64 } from 'js-base64';23// Generate code_challenge4const sha256 = (plain: string) => {5 const encoder = new TextEncoder();6 const data = encoder.encode(plain);7 return window.crypto.subtle.digest('SHA-256', data);8};910const base64urlencode = (hashed: ArrayBuffer) => {11 const bytes = new Uint8Array(hashed);12 const base64encoded = Base64.fromUint8Array(bytes, true);13 return base64encoded;14};1516export const generateCodeChallengeFromVerifier = async (codeVerifier: string) => {17 const hashed = await sha256(codeVerifier);18 const base64encoded = base64urlencode(hashed);19 return base64encoded;20};2122const codeChallenge = await generateCodeChallengeFromVerifier(codeVerifier);
The authorization_code will be returned in the response, which you should then return to the client side as authCode in order to initialize the SDK.
Initialize the SDK with properties
In this step, we will verify your proof to use the SDK and prepare the component based on your configurations like running environment, display language, etc.
Call the asynchronous method sdk.init(options) with your credentials and configurations, and wait a little for us to get the component ready. For details of the options, please see Initialization JS.
1import { init } from '@airwallex/components-sdk'23await init({4 locale: 'en',5 env: 'prod',6 enabledElements: ['payouts'],7 authCode: '<auth_code>',8 clientId: '<client_id>',9 codeVerifier: '<code_verifier>',10});
Step 2: Add the Embedded Transfer component to your page
To embed a component into your page, you will need to create an empty container, create an instance of the component, and mount it to the container.
Define the container
First, create an empty container div with a unique id. Airwallex inserts an iframe into this div on mounting the instance of the component.
1<!--Create an empty container for the instance of the component-->2<div id=”transfer-form-container”></div>
Create the Embedded Transfer component
To create the component, call createElement(type, options) and specify the type as payoutForm. This method creates an instance of the component. Components are rendered as iframes. For details of the properties, please see Create Element JS.
1import { createElement } from '@airwallex/components-sdk'23const transferComponent = await createElement('payoutForm', options);4
Mount the Transfer component
Call element.mount(domElement) to attach the instance of the component to the prebuilt container. The instance should only be mounted once.
1import { createElement } from '@airwallex/components-sdk'23const transferComponent = await createElement('payoutForm', options);4transferComponent.mount('#payout-form-container');5
Step 3: Interact with the Embedded Transfer component
You should have successfully embedded the Transfer component into your page. Now the user can interact with the component to provide information for making a transfer.
The transferComponent provides a set of methods and event listeners to handle user interactions.
For details of the transferComponent's events and methods, please see Interact with element object JS.
Events
Add event listeners to handle events received from Airwallex.
1transferComponent.on('ready', () => {2 // Add needed logic after component is rendered3});4
Events can be used to facilitate other flows in your user interface where applicable. Please find more details in the list of events below.
You can introduce different call-to-actions based on the user input by monitoring the values in the change event. For example, you can trigger an approval flow based on the source amount, i.e., when it is above a certain threshold amount, you can guide the user to go through a different user flow.
You can also monitor errors as part of the formState event and provide additional guidance for the users so they can fix the errors. The list of possible errors can be found in the Errors and events section.
Step 4: Retrieve the final payload from the Embedded Transfer component
When you are ready to retrieve the final payload to Create a new transfer API, you can call the submit function. It will trigger the validation of all fields in the component and return you the payload. For details of the final payload, please see Get final payload from submit method JS.
1const results = await transferComponent.submit();
Next steps
Create a new transfer
You can create transfers with the payload you have retrieved by calling the Create a new transfer API endpoint. Please make sure that your request also contains the required beneficiary information.
- If you have created beneficiaries with Airwallex previously, you can provide a
beneficiary_idin your request. - If you already have the beneficiary information, you can specify the parameters in the
beneficiaryobject in your request. - If you want to collect beneficiary information from your users similarly as you do for transfers, you can use the Embedded Beneficiary component to generate a beneficiary payload and aggregate it into your transfer payload.
See Create a transfer to learn more about this endpoint.
Please note that this API call should only happen on the server side, a trusted environment.
Test your integration
Build and test your integration in the sandbox environment first before going to production. Make sure to account for various success and error scenarios.
Troubleshooting
For troubleshooting tips, see Airwallex.js error codes.
Example integrations
We have a few examples of rendered components with different customizations. Check them out on the Embedded Components demo site .
FAQ
Does the transfer component support Strong Customer Authentication (SCA)?
The transfer component does not support Strong Customer Authentication (SCA). You still need to build SCA on top of the component (e.g. two-factor authentications) to comply with regulations such as the second Payment Services Directive (PSD2), if applicable.